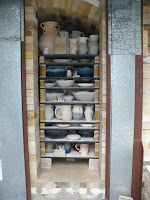


First pic shows the bag wall design. The bottom 2 rows of the bag wall are mortared in. I kept the vertical bricks & horizontals above loose for this firing, so I can adjust for the next firing if desired.
Half bricks were used under the bottom shelves, to give a 4.5" rise off the kiln floor.
Cone packs, that indicate how hot the kiln gets at a particular site in the kiln, were in front of each of the 6 peep holes, and an additional dozen were scattered around the kiln, including the floor and bagwall.
The next 3 photos are the back, middle & front stacks of shelves.
I had mis-judged just how much larger this kiln is than my last kiln.
A friend had brought over some pots a few days previous to add to this firing. I still ended up bringing some pots from the "archives" to be re-fired, in an effort to fire a full kiln.
One thing I didn't discover until I was stacking the front shelves was this: Since I had to turn the kiln shelves sideways to get them through the doorway, there was a limit as to how high I could put the top shelf in front. I will have to make sure I have at least a kiln shelf of taller pieces for every kiln load fired.
No comments:
Post a Comment